This article explains, as example,
- how to create, with STM32CubeIDE, boot and secure project in case of Arm®-Cortex®-M33 boot flavor, for STM32MP25x lines
 ,
, - how to configure and debug TF-M.
It explains how to:
- populate STM32MP257F-EV1 Evaluation board
 with M33-TD image on :
- sNOR for Arm®-Cortex®-M33,
- SD card for Linux® Arm®-Cortex®-A35,
- update Arm®-Cortex®-M33 firmware thanks to a dedicated version of STM32CubeIDE release 1.17.0.25-MP25-CM33TD-BETA, available on myteamspace/MCD Alpha - STM32MP25_M33-TD.
1. Prerequisites[edit | edit source]
1.1. Hardware prerequisites[edit | edit source]
- Linux® or Windows® host PC must be connected to the board to enable:
- Arm®-Cortex®-A35 console,
- Arm®-Cortex®-M33 console.
- STM32MP257F-EV1 Evaluation board Rev D (ONLY). To set up the board, follow instructions given in STM32MP257x-EV1 - hardware description article.
1.2. Software prerequisites[edit | edit source]
On host PC:
- Install build environment and toolchain, required for TF-M, as described in How to configure TF-M#Prerequisite prerequisite chapter.
- Install python libraries needed by OP-TEE signature python script:
 pip install pyelftools
 pip install pycryptodomex
- STM32CubeIDE release 1.17.0.25-MP25-CM33TD-BETA must be installed (to get Flash memory device feature, allowing sNOR target update). The installation executable are available on myteamspace/MCD Alpha - STM32MP25_M33-TD/Tools/CubeIDE. Depending on your host PC, select the right executable amongst the 4 available:
- Windows,
- Linux,
- Linux Debian package,
- Linux Ubuntu package.
- STM32CubeProgrammer must be installed on your PC. Refer to STM32CubeProgrammer for installation procedure.
2. Set up embedded software[edit | edit source]
2.1. Populate the board with new OpenSTLinux release providing M33-TD boot[edit | edit source]
- Retrieve the image, FLASH-stm32mp2-m33td-openstlinux-6.6-yocto-scarthgap-m33td-v25.01.03.tar, from myteamspace/MCD Alpha - STM32MP25_M33-TD/embedded software.
- Flash your board with "FlashLayout_nor-sdcard_stm32mp257f-ev1-cm33tdcid-ostl-optee.tsv" available in the "FLASH-stm32mp2-m33td-openstlinux-6.6-yocto-scarthgap-m33td-v25.01.03.tar" in directory "stm32mp2-m33td-openstlinux-6.6-yocto-scarthgap-m33td-v25.01.03/images/stm32mp2-m33td/flashlayout_st-image-weston/optee/". How to flash with STM32Cube Programmer, is explained in STM32MP25_Evaluation_boards_-_Starter_Package#Image_flashing.
As explained in STM32MP25_Evaluation_boards_-_Starter_Package#Image_flashing, to flash, boot pins must be set as defined below:
| Boot mode | Boot 3 | Boot 2 | Boot 1 | Boot 0 |
|---|---|---|---|---|
| UART/USB | 0 | 0 | 0 | 0 |
Flashing board with STM32CubeProgrammer:

2.2. Boot the board[edit | edit source]
2.2.1. Configure boot pins[edit | edit source]
Once the embedded software has been downloaded in the board, specific boot pins configuration is needed to boot on Arm®-Cortex®-M33 with the wished dual mass storage:
- Arm®-Cortex®-M33 from sNOR,
- Arm®-Cortex®-A35 from SD card.
| Boot mode | Boot 3 | Boot 2 | Boot 1 | Boot 0 |
|---|---|---|---|---|
| Arm®-Cortex®-M33 from sNOR Arm®-Cortex®-A35 from SD card |
1 | 1 | 1 | 0 |
2.2.2. Create a second console[edit | edit source]
Two consoles are needed to check the dual boot.
For example, on OS Windows, they are available as COM12 & COM13.
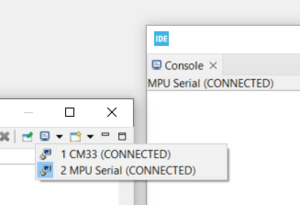
- The default one (COM12) is used for the Arm®-Cortex®-A35/Linux. It is available clicking on "MPU Serial console icon"
 . It is recommended to detach the associated windows. This can be done thanks to right menu on "Console" tab.
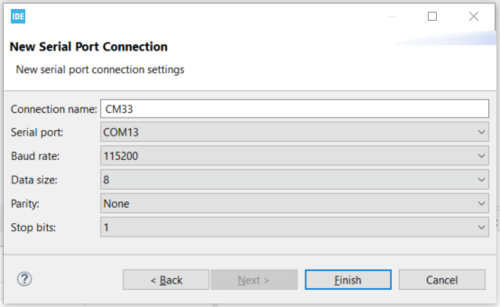
 - An additional console (COM13) is needed for Arm®-Cortex®-M33/FwST-M. To add a console goes in menus "Window > Show View > Other"... then "Connections > Connections" window. "New connection" icon opens a wizard where "Serial Port" can be selected.
Then, open a the console with "Open Console" icon from "Console window" and detach it.
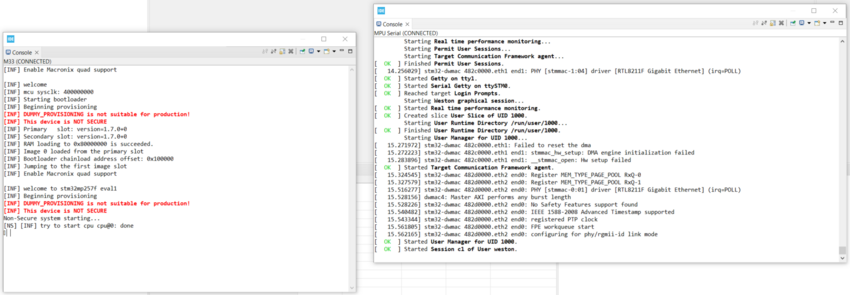
2.2.3. Start your board[edit | edit source]
To boot your board, you need to reset it by pressing on the "reset button" on the board.
See dual boot steps, on the both consoles, in the screenshot below:
3. Get embedded software code source for further updates[edit | edit source]
Only TF-M, TF-M tests, and External device tree are needed to create M33-TD boot and secure project.
TF-M and TF-M tests components must be updated, for that, git clone them on your local disk:
- trusted-firmware-m (https://github.com/PRG-MPU-ALPHA/trusted-firmware-m.git) CMake secure project, implementing ST device customization (branch: v1.7.0-stm32mp25-alpha-w2450; tag: v1.7.0-stm32mp25-alpha-r1).
- tf-m-tests (https://github.com/PRG-MPU-ALPHA/tf-m-tests) CMake nonsecure project starting Linux on Cortex®-A (branch: v1.7.0-stm32mp25-w2446; tag: v1.7.0-stm32mp25-alpha-r1).
CMAke projects are needed as source to config and recompile and debug the TF-M. Objective is to customize the TF-M and TF-M tests (which is an example of use).
External device tree component must be also updated (External DT is needed to start cortex-A), for that, git clone it on your local disk:
- dt-stm32mp (https://github.com/PRG-MPU-ALPHA/dt-stm32mp) (branch: main; tag: v6.0-stm32mp-alpha-r1).
4. Create, build and populate a M33-TD boot project[edit | edit source]
To create the "M33-TD boot project" , you need first to create an STM32CubeIDE "empty" project, to import the CMake project delivered in TF-M.
Then configuration will be possible in TF-M, TF-M tests.
4.1. Create an STM32CubeIDE empty project[edit | edit source]
To create an STM32CubeIDE empty project:
- "File > New > STM32 Project"... ,
- Then, type in "Board selector" > "Commercial Part Number": "MP257F-EV1"... and then "Next".
Selecting "STM32MP257F-EV1 board" creates "empty" project, with TrustZone enabled, named here "myStm32mp257f".
- In STM32 Project wizard, fill "Project Name", select "Empty" "Targeted Project Type" and "Finish".

4.2. Import Trusted-firmware-M CMake project in STM32CubeIDE[edit | edit source]
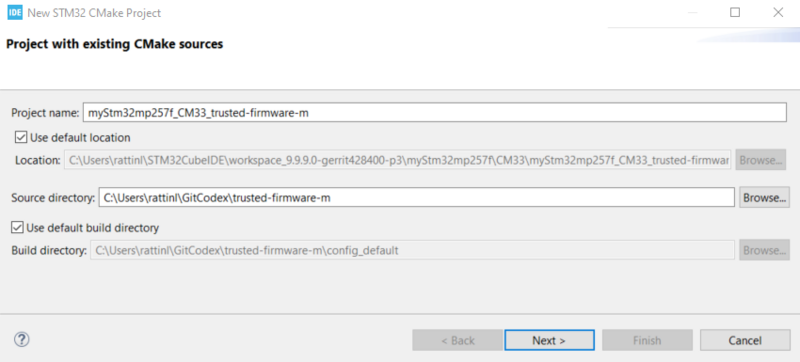
Then import CMake project inside STM32CubeIDE "myStm32mp257f" "empty" project.
- For that, select "myStm32mp257f_CM33" project and right click to "Create a STM32 CMake Project using existing CMake sources" menu.

- Set "Source directory" to trusted-firmware-M CMake project. For that use "Browse".
- Set "Source directory" field to "trusted-firmware-m local repository".
- Set appropriate "Project name" field to "myStm32mp257f_CM33_trusted-firmware-m".
- Click "Next".
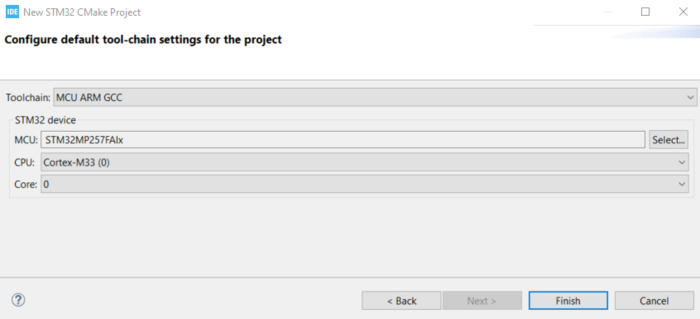
Then, fill debug information giving MCU, CPU and Core.
- "myStm32mp257f_CM33_trusted-firmware-m" project is now visible inside STM32CubeIDE project.
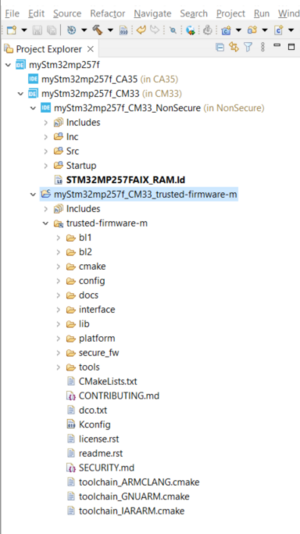
- As depicted here after, "trusted-firmware-M" is a link to local repository.
Trusted-firmware-M sources stay physically in your local directory but they are visible in STM32CubeIDE thanks to a link.

Empty project creation has no specific option for CM33TDCID profile, it relies on "trusted-firmware-M" CMake project customization.
You can now refresh STM32CubeIDE project and view sources.
4.3. Configure Trusted-firmware-M CMake project[edit | edit source]
Select "myStm32mp257f_CM33_trusted-firmware-m" project and right click to get "Properties".
Then:
- Choose "C/C++ Build".
- Select the "CMake Settings" tabulation where "Other options" must be filled with configuration given below.
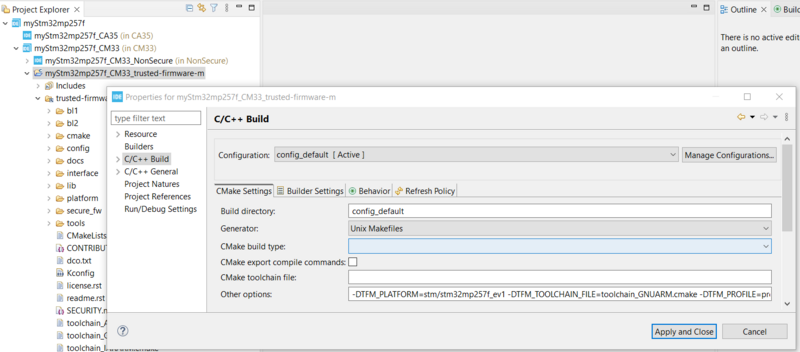
Below is given, the CMake configuration to apply:
- It uses "tf-m-tests" nonsecure project which start Linux on Cortex-A.
- The device tree, used in native OpenSTLinux, are needed.
- The debug mode is activated in BL2.
For Windows host PC Click on "Expand", visible on the right side of the page
-DTFM_PLATFORM=stm/stm32mp257f_ev1
-DTFM_TOOLCHAIN_FILE=toolchain_GNUARM.cmake
-DTFM_PROFILE=profile_medium
-DSTM32_M33TDCID=ON
-DCMAKE_BUILD_TYPE=Relwithdebinfo
-DTFM_TEST_REPO_PATH="C:\ <PATH-TO-TF-M-TESTS>\tf-m-tests"
-DSTM32_BOOT_DEV=ospi
-DDEBUG_AUTHENTICATION=FULL
-DDTS_EXT_DIR="C:\<PATH-TO-EXTERNAL-DT>\tfm"
-DDTS_BOARD_BL2=stm32mp257f-ev1-cm33tdcid-ostl-bl2-nor.dts
-DDTS_BOARD_S=stm32mp257f-ev1-cm33tdcid-ostl-s-sdcard.dts
-DDTS_BOARD_NS=stm32mp257f-ev1-cm33tdcid-ostl-ns.dts
Same configuration is given below to make easy copy/paste. Do not forget to change also the PATHs in the copied configuration:
-DTFM_PLATFORM=stm/stm32mp257f_ev1 -DTFM_TOOLCHAIN_FILE=toolchain_GNUARM.cmake -DTFM_PROFILE=profile_medium -DSTM32_M33TDCID=ON -DCMAKE_BUILD_TYPE=Relwithdebinfo -DTFM_TEST_REPO_PATH="C:\<PATH-TO-TF-M-TESTS>\tf-m-tests" -DSTM32_BOOT_DEV=ospi -DDEBUG_AUTHENTICATION=FULL -DDTS_EXT_DIR="C:\<PATH-TO-EXTERNAL-DT>\tfm" -DDTS_BOARD_BL2=stm32mp257f-ev1-cm33tdcid-ostl-bl2-nor.dts -DDTS_BOARD_S=stm32mp257f-ev1-cm33tdcid-ostl-s-sdcard.dts -DDTS_BOARD_NS=stm32mp257f-ev1-cm33tdcid-ostl-ns.dts
For Linux host PC Click on "Expand", visible on the right side of the page
-DTFM_PLATFORM=stm/stm32mp257f_ev1
-DTFM_TOOLCHAIN_FILE=toolchain_GNUARM.cmake
-DTFM_PROFILE=profile_medium
-DSTM32_M33TDCID=ON
-DCMAKE_BUILD_TYPE=Relwithdebinfo
-DTFM_TEST_REPO_PATH=<PATH-TO-TF-M-TESTS>/tf-m-tests
-DSTM32_BOOT_DEV=ospi
-DDEBUG_AUTHENTICATION=FULL
-DDTS_EXT_DIR=<PATH-TO-EXTERNAL-DT>/tfm
-DDTS_BOARD_BL2=stm32mp257f-ev1-cm33tdcid-ostl-bl2-nor.dts
-DDTS_BOARD_S=stm32mp257f-ev1-cm33tdcid-ostl-s-sdcard.dts
-DDTS_BOARD_NS=stm32mp257f-ev1-cm33tdcid-ostl-ns.dts
Same configuration is given below to make easy copy/paste. Do not forget to change also the PATHs in the copied configuration:
-DTFM_PLATFORM=stm/stm32mp257f_ev1 -DTFM_TOOLCHAIN_FILE=toolchain_GNUARM.cmake -DTFM_PROFILE=profile_medium -DSTM32_M33TDCID=ON -DCMAKE_BUILD_TYPE=Relwithdebinfo -DTFM_TEST_REPO_PATH=<PATH-TO-TF-M-TESTS>/tf-m-tests -DSTM32_BOOT_DEV=ospi -DDEBUG_AUTHENTICATION=FULL -DDTS_EXT_DIR=<PATH-TO-EXTERNAL-DT>/tfm -DDTS_BOARD_BL2=stm32mp257f-ev1-cm33tdcid-ostl-bl2-nor.dts -DDTS_BOARD_S=stm32mp257f-ev1-cm33tdcid-ostl-s-sdcard.dts -DDTS_BOARD_NS=stm32mp257f-ev1-cm33tdcid-ostl-ns.dts
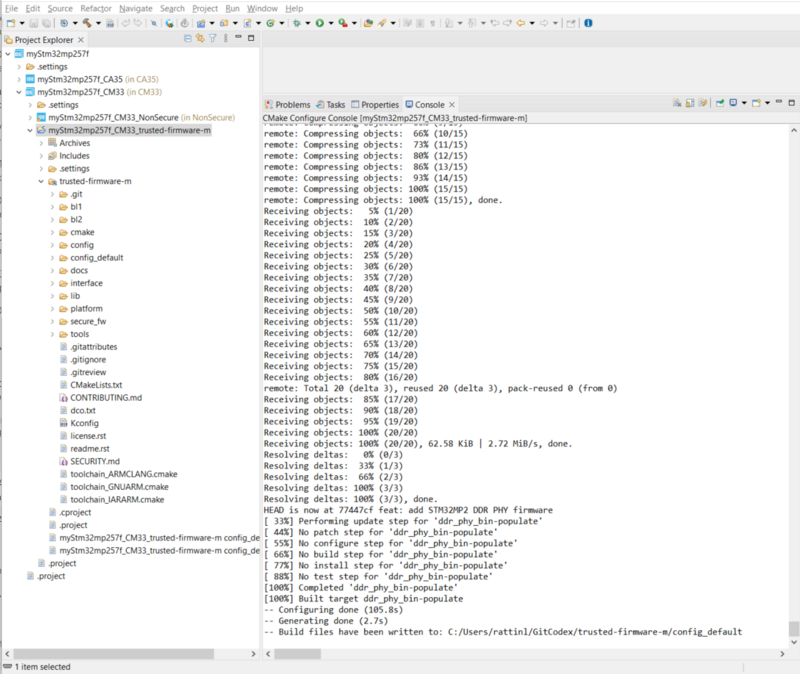
Now, it is possible to configure CMake"myStm32mp257f_CM33_trusted-firmware-m" project.
- Select "myStm32mp257f_CM33_trusted-firmware-m" project and right click to "CMake Configure".
4.4. Build created project with STM32CubeIDE[edit | edit source]
As mentioned in How to configure TF-M, "trusted-firmware-m" project is built with build target "install".
Then:
- Choose "C/C++ Build".
- Select the "Behavior" tabulation where the field "Build (Incrementale build)" must be checked
 and filled with "--target install".
 - Then click on "Apply and close".
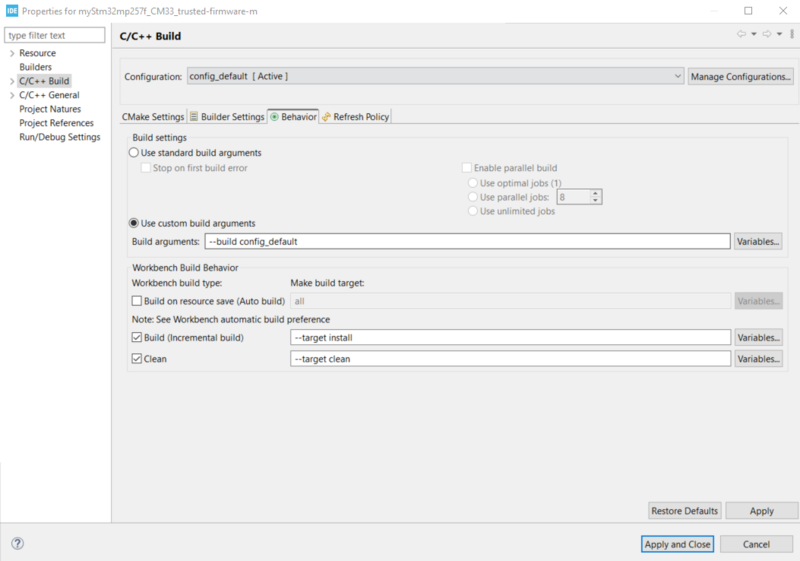
It is now possible to build trusted-firmware-m and tf-m-tests using standard Eclipse "Build icon".
4.5. Populate board with the created M33-TD boot project with STM32CubeIDE[edit | edit source]
STM32CubeIDE proposes "Flash device memory" menu, based onto STM32CubeProgrammer and its .tsv files.
It is recommended
- to copy original .tsv file "FlashLayout_nor-sdcard_stm32mp257f-ev1-cm33tdcid-ostl-optee.tsv" inside its directory,
- and to rename it adding STM32CubeIDE "myStm32mp257f" project name: "FlashLayout_nor-sdcard_stm32mp257f-ev1-cm33tdcid-ostl-optee_myStm32mp257f.tsv".
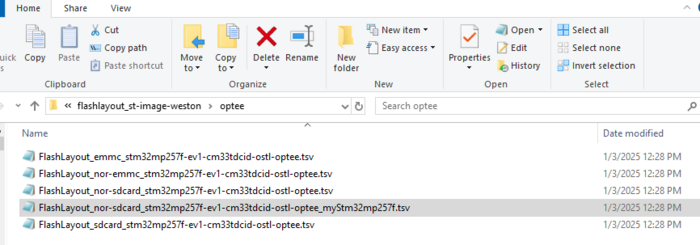
- In this new .tsv file, you must change <YOUR PATH> by the path of the directories containing the binaries generated in previous chapter.
The .tsv file can be then used, after any image generation.

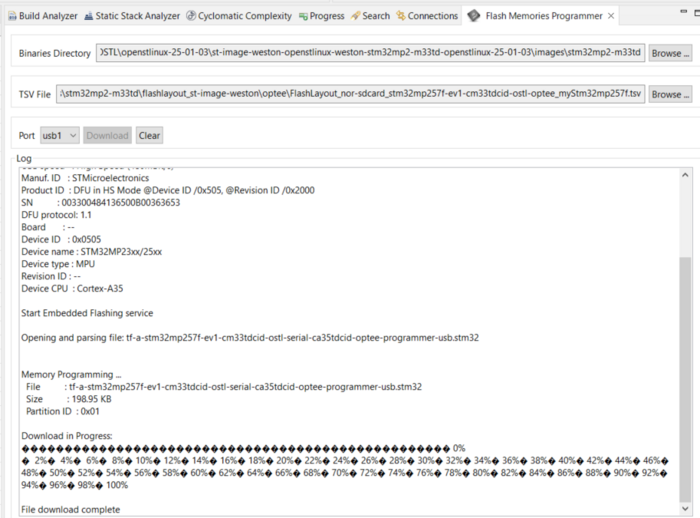
- Select "myStm32mp257f_CM33_trusted-firmware-m" project and right click to get "Program memory device".
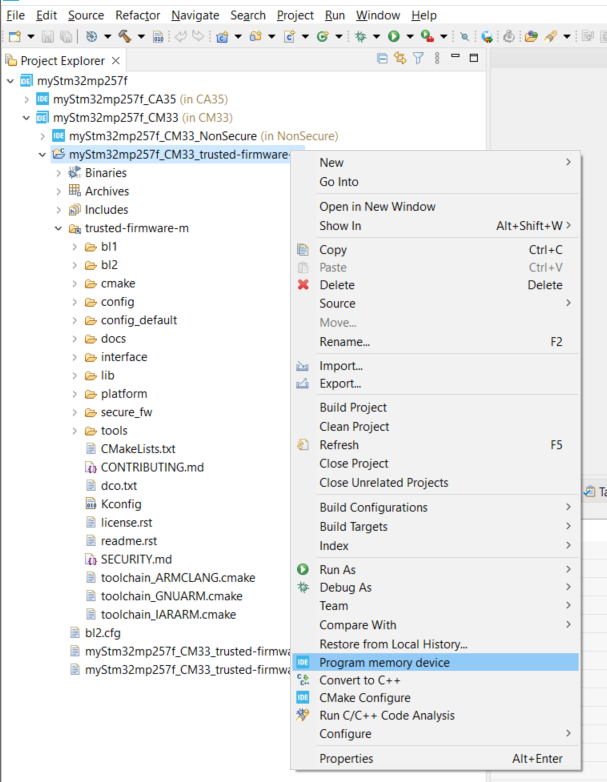
- Update on-board flash: sNOR and SD card here: GO in Tab "Flash memories programmer":
- Fill "Binaries Directory" with the path to binaries inside OpenSTLinux images.
- Fill "TSV File" with the updated .tsv file.
- Click on "Download" button.
5. Configure the debug option[edit | edit source]
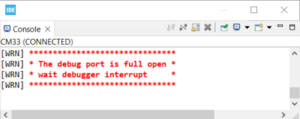
Debug is based onto -DDEBUG_AUTHENTICATION=FULL build flag. With this flag, BL2 opens debug port and waits a debugger connection.
The picture below shows the Arm®-Cortex®-M33 console, on reboot, after target update using this set-up.
5.1. Prerequisite for debugging[edit | edit source]
As prerequisite, "myStm32mp257f_CM33_trusted-firmware-m" project needs to be updated.
- First, in "Project explorer", click on "View Menu" icon and select "Filters and Customization".
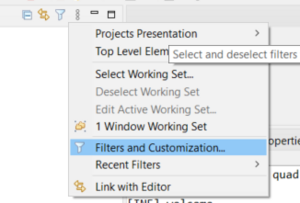
- Unselect ".* resources" choice.
- Open, with "Text Editor", ".project" file inside "myStm32mp257f_CM33_trusted-firmware-m" project and add two project nature:
<nature>com.st.stm32cube.ide.mcu.MCUProjectNature</nature>
<nature>com.st.stm32cube.ide.mpu.MPUEmbeddedMCUProjectNature</nature>
5.2. Debug configuration creation[edit | edit source]
Select "myStm32mp257f_CM33_trusted-firmware-m" project and right click to get "Debug As" > "Debug configurations".
Double click "STM32 C/C++ Application" and edit debug configuration:
- In "main" tabulation, "Search Project" and select "bl2.elf".
- In "Debugger" tabulation, "Load Mode" and select "thru JTAG/SWD link (Engineering mode)".
- In "Startup" tabulation:
- Disable "Resume".
- Select the "Load Image and Symbols" element click "Edit" and disable "Download".
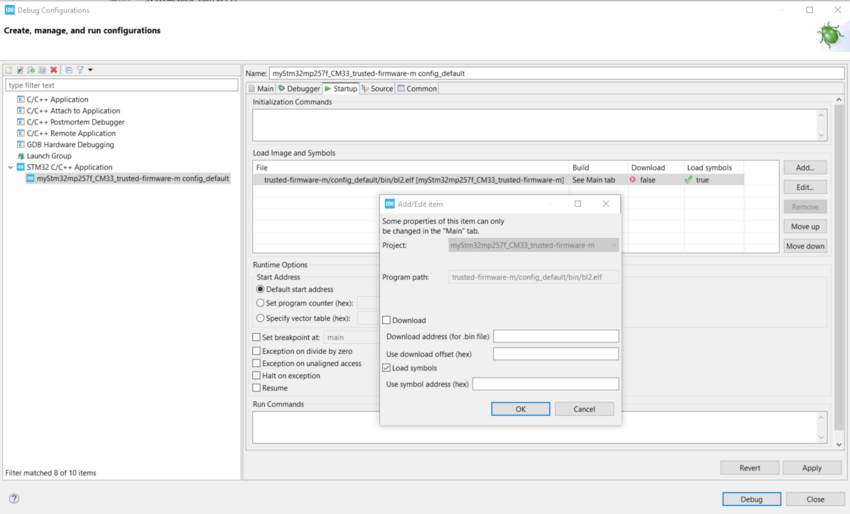
"Apply" and "Debug".

Now, you can step into BL2 code, and if you resume it, will start Linux® on Arm®-Cortex®-A35.

Arm® is a registered trademark of Arm Limited (or its subsidiaries) in the US and/or elsewhere. ![]()
Arm® is a registered trademark of Arm Limited (or its subsidiaries) in the US and/or elsewhere. ![]()