1. Introduction
This sub-1GHz NUCLEO-WL33 wiki page contains an out-of-the-box demo and showcases the different features of the STM32WL33 product.
It provides a guide to the initial setup of the NUCLEO-WL33CC1 board and offers guidance and links to other wiki pages for starting application development.
Explore the full potential of the STM32WL3x series with this comprehensive demo guide. With just a few clicks, access and program the STM32WL33 chipset and establish sub-1GHz RF communication.
Refer to the Introduction to sub-1GHz wiki page for more details on sub-1GHz connectivity and an in-depth description of the STMicroelectronics sub-1GHz portfolio.
| NUCLEO-WL33CC box contents |
|---|
 |
2. Tools
2.1. Software and system requirements↑
The following software tools are required:
- One of the following IDEs:
- IAR Embedded Workbench for ARM (EWARM) toolchain V9.30.1 or above + ST-LINK, patch available here:
- STM32Cube_FW_WL3_V1.x.x\Utilities\PC_Software\EWARMv9_STM32WL3x_V1.0.0.zip
- This patch supports STM32WL33 devices
- Arm® Keil® V5.37 or above, patch available here:
- STM32Cube_FW_WL3_V1.x.x\Utilities\PC_Software\Keil.STM32WL3x_DFP.1.0.0.zip
- This patch supports STM32WL33 devices
- STM32CubeIDE V1.17.0 or above:
- Supports STM32WL33 devices
- More details about STM32CubeIDE in this article
- IAR Embedded Workbench for ARM (EWARM) toolchain V9.30.1 or above + ST-LINK, patch available here:
- STM32CubeProgrammer, to program the board with a generated binary.
- The STM32CubeWL3 MCU Package, available from:
2.2. Hardware requirements
The following hardware equipment is required:
- NUCLEO-WL33CC1 board
- USB Type-C® cable
| NUCLEO-WL33CC1 |
|---|
 |
3. Building and programming a project
The \STM32Cube_FW_WL3_V1.0.0\Projects\NUCLEO-WL33CC\Demonstrations\Command_Line_Interface\CLI project (on GitHub) demonstrates the basics and can be used in further steps.
3.1. Building and programming with STM32CubeIDE using onboard ST-LINK
- Open the project by doing one of the following:
- Double-clicking the .cproject file in \STM32Cube_FW_WL3_V1.0.0\Projects\NUCLEO-WL33CC\Demonstrations\Command_Line_Interface\CLI\STM32CubeIDE
- Importing the path by running STM32CubeIDE (File -> Open Projects from File System), as shown by the image below:

- Build the project (Project -> Build project or click the icon, as shown by the image below):


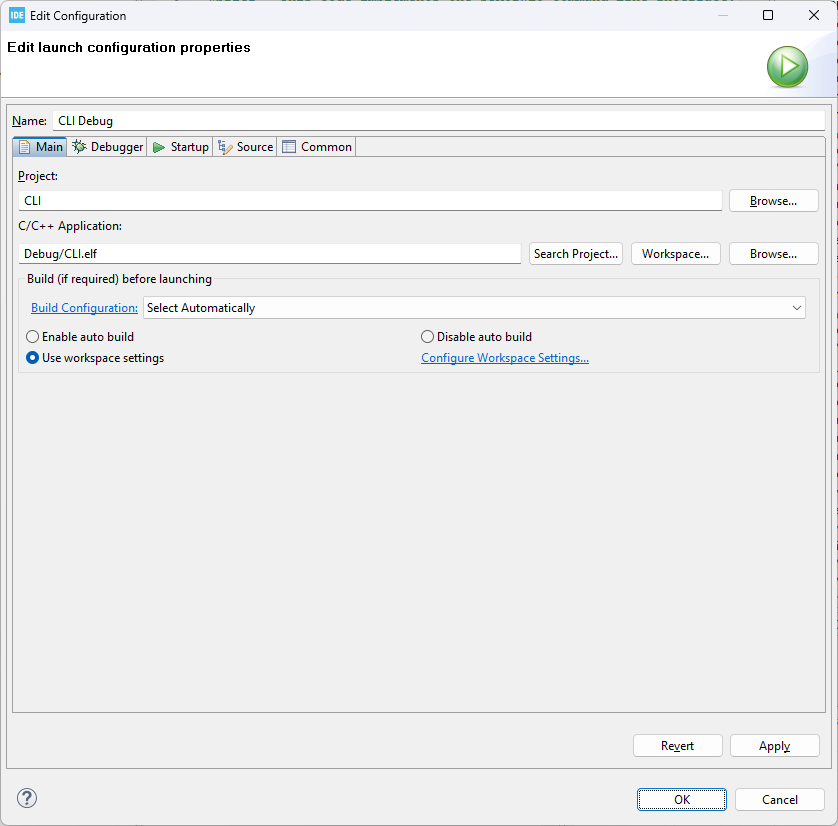
- Program the project (Run -> Run As -> STM32 C/C++ Application, as shown by the image below):

- In the pop-up window (as shown in the image below), click OK to program the CLI firmware onto the board.


3.2. Building and programming with Arm® Keil® using onboard ST-LINK
- Make sure that the patch was installed (STM32Cube_FW_WL3_V1.x.x\Utilities\PC_Software\Keil.STM32WL3x_DFP.1.0.0.zip)
- Open \STM32Cube_FW_WL3_V1.0.0\Projects\NUCLEO-WL33CC\Demonstrations\Command_Line_Interface\CLI\CLI.uvprojx
- Build the project (Project -> Build Target (F7), as shown by the image below):

- Program the board (Flash -> Download, as shown by the image below, or launch a debug session, which also triggers download):


3.3. Building and programming with IAR Embedded Workbench using onboard ST-LINK
- Make sure that the patch was installed (STM32Cube_FW_WL3_V1.x.x\Utilities\PC_Software\EWARMv9_STM32WL3x_V1.0.0.zip)
- Open \STM32Cube_FW_WL3_V1.0.0\Projects\NUCLEO-WL33CC\Demonstrations\Command_Line_Interface\CLI\EWARM
- Build the project (Project -> Make (F7), as shown by the image below):
- Download the project (Project -> Download -> Download active application, as shown by the image below, or click Download and Debug):


3.4. Connecting to the device using STM32CubeProgrammer and ST-LINK
STM32CubeProgrammer can be used to view the device memory, download firmware to the device, upload the device memory to a file, manage the device option bytes, and much more.
In this case, STM32CubeProgrammer can be used to download the built binary (from either of the IDEs) to a device or multiple devices.
To do so:
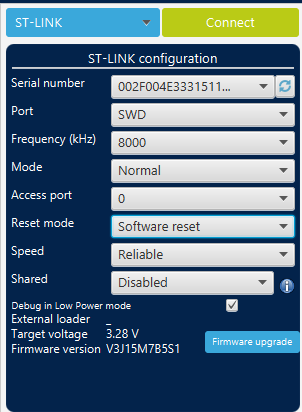
- Launch STM32CubeProgrammer and connect to the device (reset mode must be set to Software reset, other settings can be left at default value)
- Open the compiled CLI binary from either of the IDEs:
- For STM32CubeIDE: \CLI\STM32CubeIDE\Debug\CLI.elf (hex generation can be enabled in the project settings)
- For Arm® Keil®: \CLI\MDK-ARM\Release\Exe\CLI.hex or CLI.axf
- For IAR: \CLI\EWARM\Release\Exe\CLI.hex
- Depending on the binary, the address may need to be set to 0x1004 0000 manually.

- Disconnect the device

